How to Optimize Your Images for Squarespace Website
Optimize your images for seamless user experience and load time
In the visual world of the internet, a single image can make or break your website’s user experience — and, therefore, its success. Visitors expect high-quality pics that load quickly and seamlessly. Images are also a big part of your identity as a brand and are a driver of trust for your potential customers.
So, optimizing your images is essential for improving the experience you offer users and guaranteeing your website’s success. Whether you're a blogger, artist, or entrepreneur, making sure your images are on-point is the key to capturing your audience's attention and keeping them engaged.
This is not to mention that optimizing your images will bring you up in search engine results since it is an important part of any website’s SEO.
Let's dive into the world of image optimization and go over everything you need to know to make your Squarespace website images pop.
Finding Pictures for your Squarespace Website
The first step to optimizing your images for your Squarespace website is… Well, having images to optimize!
Choosing the right images for your website can be time-consuming, but it’s a crucial task in establishing your brand identity. It’s important that you choose the overall aesthetics and visuals that align with your brand, values, and web design. If you have no idea where to begin, you can always seek inspiration from websites you like or head to Pinterest and create a vision board.
Once you've established the aesthetic that represents your brand and its mission, you can now start to source the appropriate photos and images to bring your website to life. And there are two basic options: Using stock images or taking them yourself.
Stock images. If you're just starting out and don't have many of your own photos yet, stock photos can be a solid starting point. Squarespace has an Unsplash integration that allows you to find affordable (and even free), high-quality images to use on your website. This approach might take longer, as you’ll need to carefully select images that align with your brand and display what you need. But it’s definitely cost-effective.
Your own images. The second option is taking your own photos or hiring a photographer, provided it fits within your budget. While taking your own photos seems like more of an effort than selecting stock photos, it can provide significant benefits. The photos you or your photographer take will directly represent your brand and the message you wish to convey to your potential customers. You can even take photos of yourself, your studio, or your team in action to enhance credibility and build trust with your audience.
Whatever route you take will depend on how much time and resources you can pour into this aspect of your online presence, as well as how you want to be perceived by your audience.
In the case of eCommerce websites, regardless of whether you use stock photos or not, it's crucial to take original photos of the products you sell online.
The Fundamentals of Image Optimization for Squarespace
Now that we’ve covered how to get images for your website, let’s go over the things you should keep in mind when uploading your images to Squarespace:
Image quality
Getting high-quality images starts before you upload images to a website. Even if you spend hours editing your images on your computer, it can be difficult to turn a poorly composed shot into a high-quality image using editing apps. Ultimately, the quality of the original shot plays a crucial role in the outcome of your edited image.
Another key aspect of capturing high-quality pics is good lighting. Even with a top-of-the-line camera, poorly lit shots cannot be salvaged in post-production editing. Fortunately, natural light is a readily available and cost-free option that can make your images look incredibly professional.
So, if you’re going to take original pictures for your website, make sure your camera or phone settings are properly calibrated for higher-resolution images and that you have proper lighting for the shot.
All of this also applies if you’re planning to use stock images: Always make sure they are high-resolution so that they don’t look weird on your website.
Image size
The images you upload to your website will look different depending on the device people use to access them. That essentially means that a desktop computer or laptop will display larger-sized images than tablets and mobile phones. Consequently, photos that are narrower in width may not look as good on a desktop browser, while detailed photos may appear blurry or indistinct on a mobile phone.
Squarespace's responsive design automatically resizes your photos for optimal viewing on whichever device people are using. To maintain their sharpness when resized, you should upload images between 1500 and 2500 pixels wide.
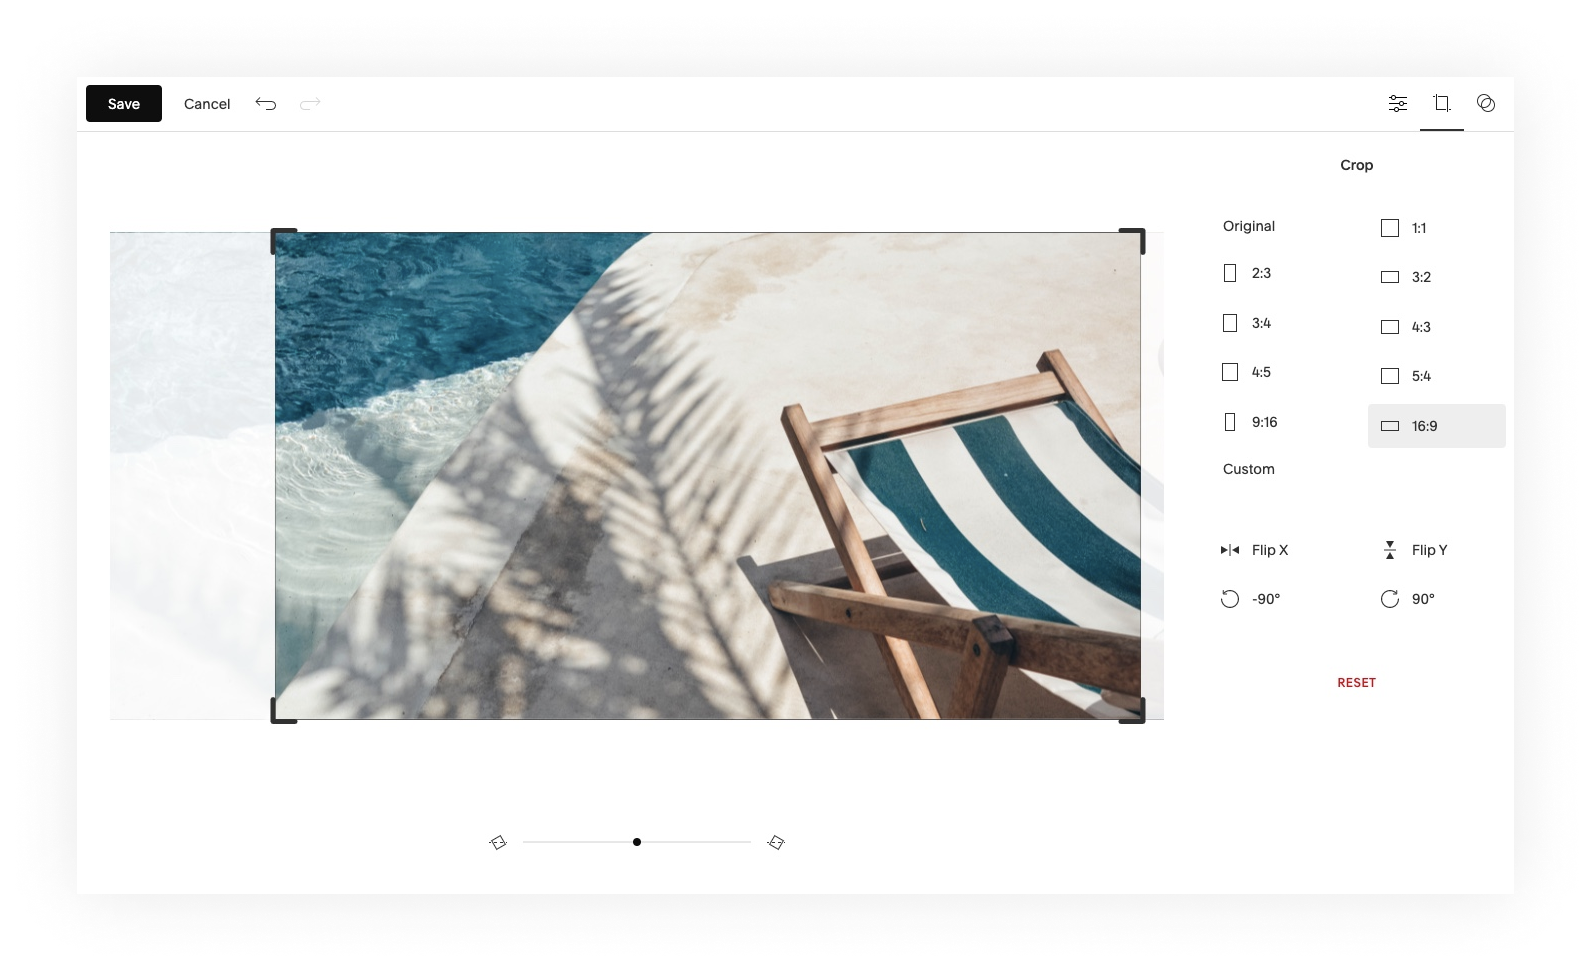
You can also crop an image you have already uploaded to Squarespace. For this go to the page edit mode, click the pencil icon next to the image, then click Edit.
However, it’s important to strike a balance between high-resolution images and smaller file sizes. As we’ll discuss later on, uploading images that are too large will slow down your page loading, which is unacceptable for both user experience and SEO. To tackle this issue, you can try compressing the image file or resizing the image if it’s very large (almost all popular image editing apps will let you do that).
Color requirements
Images for websites have different color requirements than printed photos. Print photos are typically rendered with CMYK (cyan, magenta, yellow, and black) color profiles, while photos uploaded to the web should be in RGB (red, green, and blue) color mode with standard RGB (sRGB) color profile. This ensures the images look crisp and natural on web browsers.
If you find that your images don’t appear correctly in web browsers, it’s probably because they don’t have an sRGB color profile, which is what most browsers understand. To prevent your images from looking a bit weird, always check they are not in CMYK color mode.
To check our image color profile on macOs right-click your image > Get info > Color space To examine an image's information on Windows select the image file on your computer, press Alt + Enter, in the window that opens, click Details.
Website load time
Website load time — how long it takes content to be available to a viewer — is a key ranking factor and can affect your website’s visibility on search engines. If your website takes a lot of time to load, your traffic and bounce rates might take a hit, as people are more likely to leave in frustration before your content is finally loaded on page.
The number and size of images you include on each page determine load time. Larger images typically take longer to load than smaller ones. So, if you include several large images on a page, your site might take significantly longer to appear before your users’ eyes.
The best practice for image optimization in terms of load time is to limit the size of images to 500 KB per image. Also, make sure each page on your website stays under 2 MB.
Now, how do you find out the overall image size of your website’s page? You can either use third-party online tools or your web browser’s built-in developer tools. To find the size of each page with developer tools, follow these steps:
Right-click on the page and select Inspect or Page Inspector to see the developer dashboard.
Go to the Network tab at the top of the dashboard.
Refresh the page, and under the table you should see “XYZ transferred.” The number XYZ is the size of that web page it is either in kB or MB.
Formatting requirements
Different web hosting services have different file format requirements — so does Squarespace. Let’s go over some best practices for uploading your images to the platform:
Squarespace accepts common image file extensions, like .jpg, .gif, or .png.
For photos, you should prioritize .jpg files, as they can render a wide color spectrum.
For images (think logos and infographics, and images that have transparent parts), the best file format is .png, as it supports crisp graphics that don’t have a huge variety of colors.
Ensure your image is in the correct orientation before uploading it. If it’s saved upside-down, rotate it image before loading it.
Images added to galleries will look better if they all have a similar shape.
The name of your file needs to follow certain specifications: It should only contain letters, numbers, underscores, and hyphens. If it has special characters or punctuation, it might not load properly on the site.
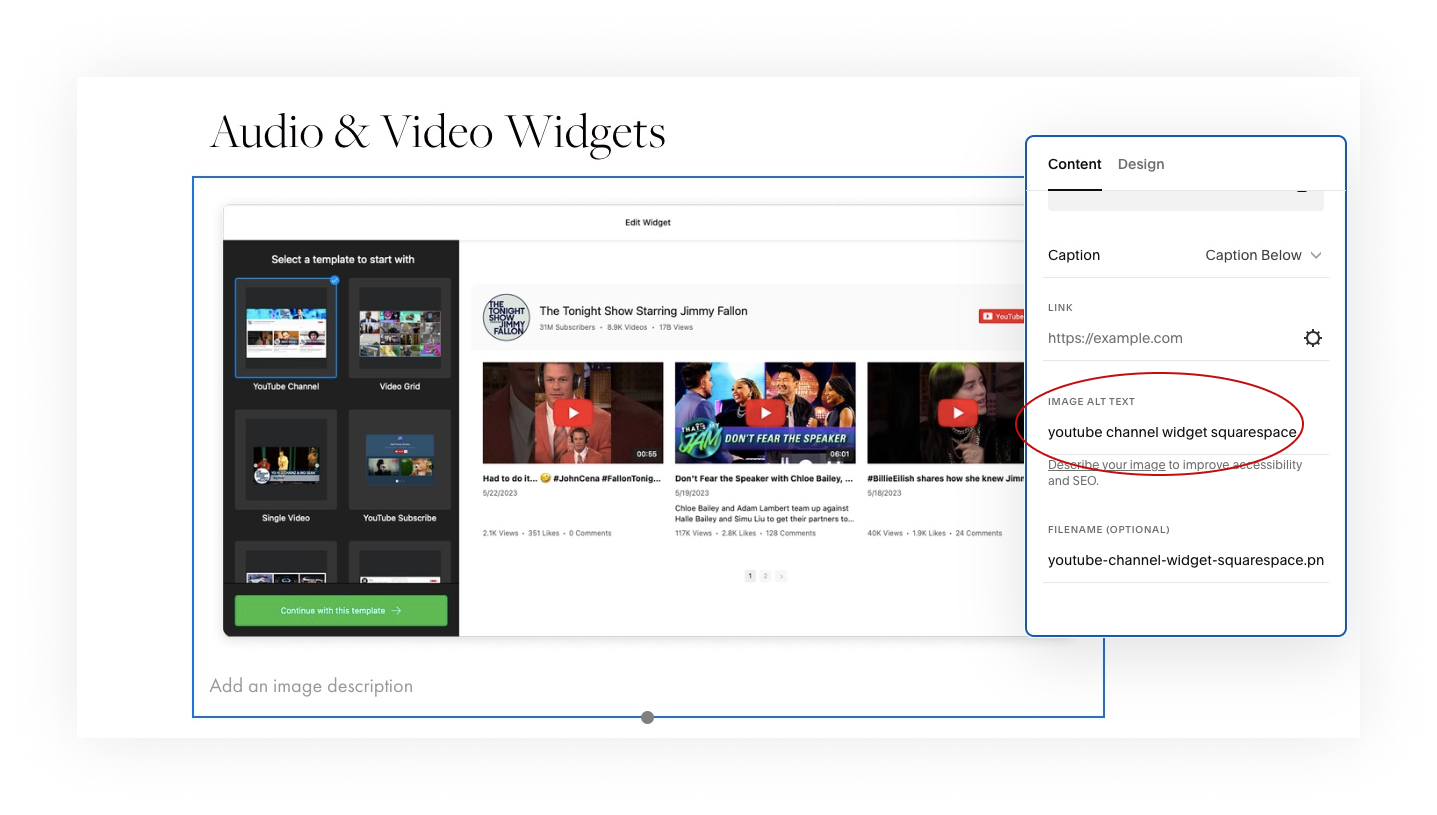
Don’t forget to add alt text. Alt text tells search engines what the image is about, improving its chances of appearing in image searches. If you don’t add alt text, the filename will act as alt text. Remember, it should be concise and descriptive. To add alt text go to the page edit mode and click a pencil icon next to an image.
When it comes to your website, nailing the imagery is essential. Not only do images enhance the overall look and feel, but they also convey the essence of your brand and its mission. By following these simple practices, you can ensure your images will look great on your Squarespace website, turning it into an impressive visual representation of your brand that captivates visitors and draws them in.
Creative Workshop Series for Squarespace
The workshop is jam-packed with design goodness. Inside, you’ll find the following topics:
What size should I design for? Responsive layouts and industry standards
Typography 101: How fonts can elevate your design & look professional
My approach to using colors in web design
Complete Figma tutorial
How to use layout grids to direct the attention of your website visitors
How to create a mood board and plan your website visuals
Squarespace Vanilla theme build-out: Complete walk-through, CSS snippets and Figma wireframe
Massive Squarespace design practicum: We go from a mood board to a finished design on Squarespace in a matter of an hour. Two designs included along with CSS plugins and Figma templates
Redesign 2 real websites with me in real time
How to grow as a designer and how to look for creative inspiration
Plus, there are some really helpful documents included: Complete Squarespace development checklist, copywriting and branding guides, sample client questionnaire and so much more!
Are you in? I’ll see you in Squarespace Mastery!